How to make a miniature

Intro
Are you a film major and have little to no idea on where to start when it comes to making a miniature? It’s not as hard as you think but it does take time and practice.
With enough time you will be able to make a miniature out of things you can find in your recycling bin and $10-$20 worth of materials.
The goal with this blog post is to provide resources that will allow students to be creative and adventure into the unknowns of a new art form with little to no overhead cost. By the end of this you should be able to create your own miniature from location in real life.
Note this blog post does not address the following types of miniatures and is solely focused on creating a realistic or semi realistic miniature so that students can film exterior shots in ways that the resources they have inhibit them from doing (top down, high wide, explosion, etc.).
If you are reading this blog post you should give this a try, even if you don’t feel like you’ll be able to do it. The worst thing you can do is fail. If that happens you can always try again and get better!

My primary reference photo.
Step 1 - take REFERENCE photos
Go to the location and take as many reference photos as you can. Most importantly take photos where you are parallel with the sides of the building you are recreating. These will allow you to get accurate measurements when you print the photos out.
For my location I wasn’t able to do this very well. I am recreating a tree house that is in someone's yard, however there is a fence, wall, and dense vegetation prohibiting me from getting a close up photo. however I did take videos and photos at different focal lengths so I had a variety of photos to pick from.
Step 2 - gather materials
Next you’ll need to grab some materials. Here is my supplies and tools list:
Supplies
Printed out reference photo
Wood
Cardboard
Hot glue
Painters tape (blue tape)
Paint
Super glue
Jumbo white pom poms
Tools
Exacto knife
Scissors
Cutting matt (plexiglass)
Tweezers
Saw
Ruler
Quick release clamps
Step 3 - figure out measurements
Grab your reference photo and ruler and measure the sides of the building. Mine came out to 2 7/8” so I rounded up and made my walls 3” wide and 2” tall.
Step 4 - Cut base PIECES
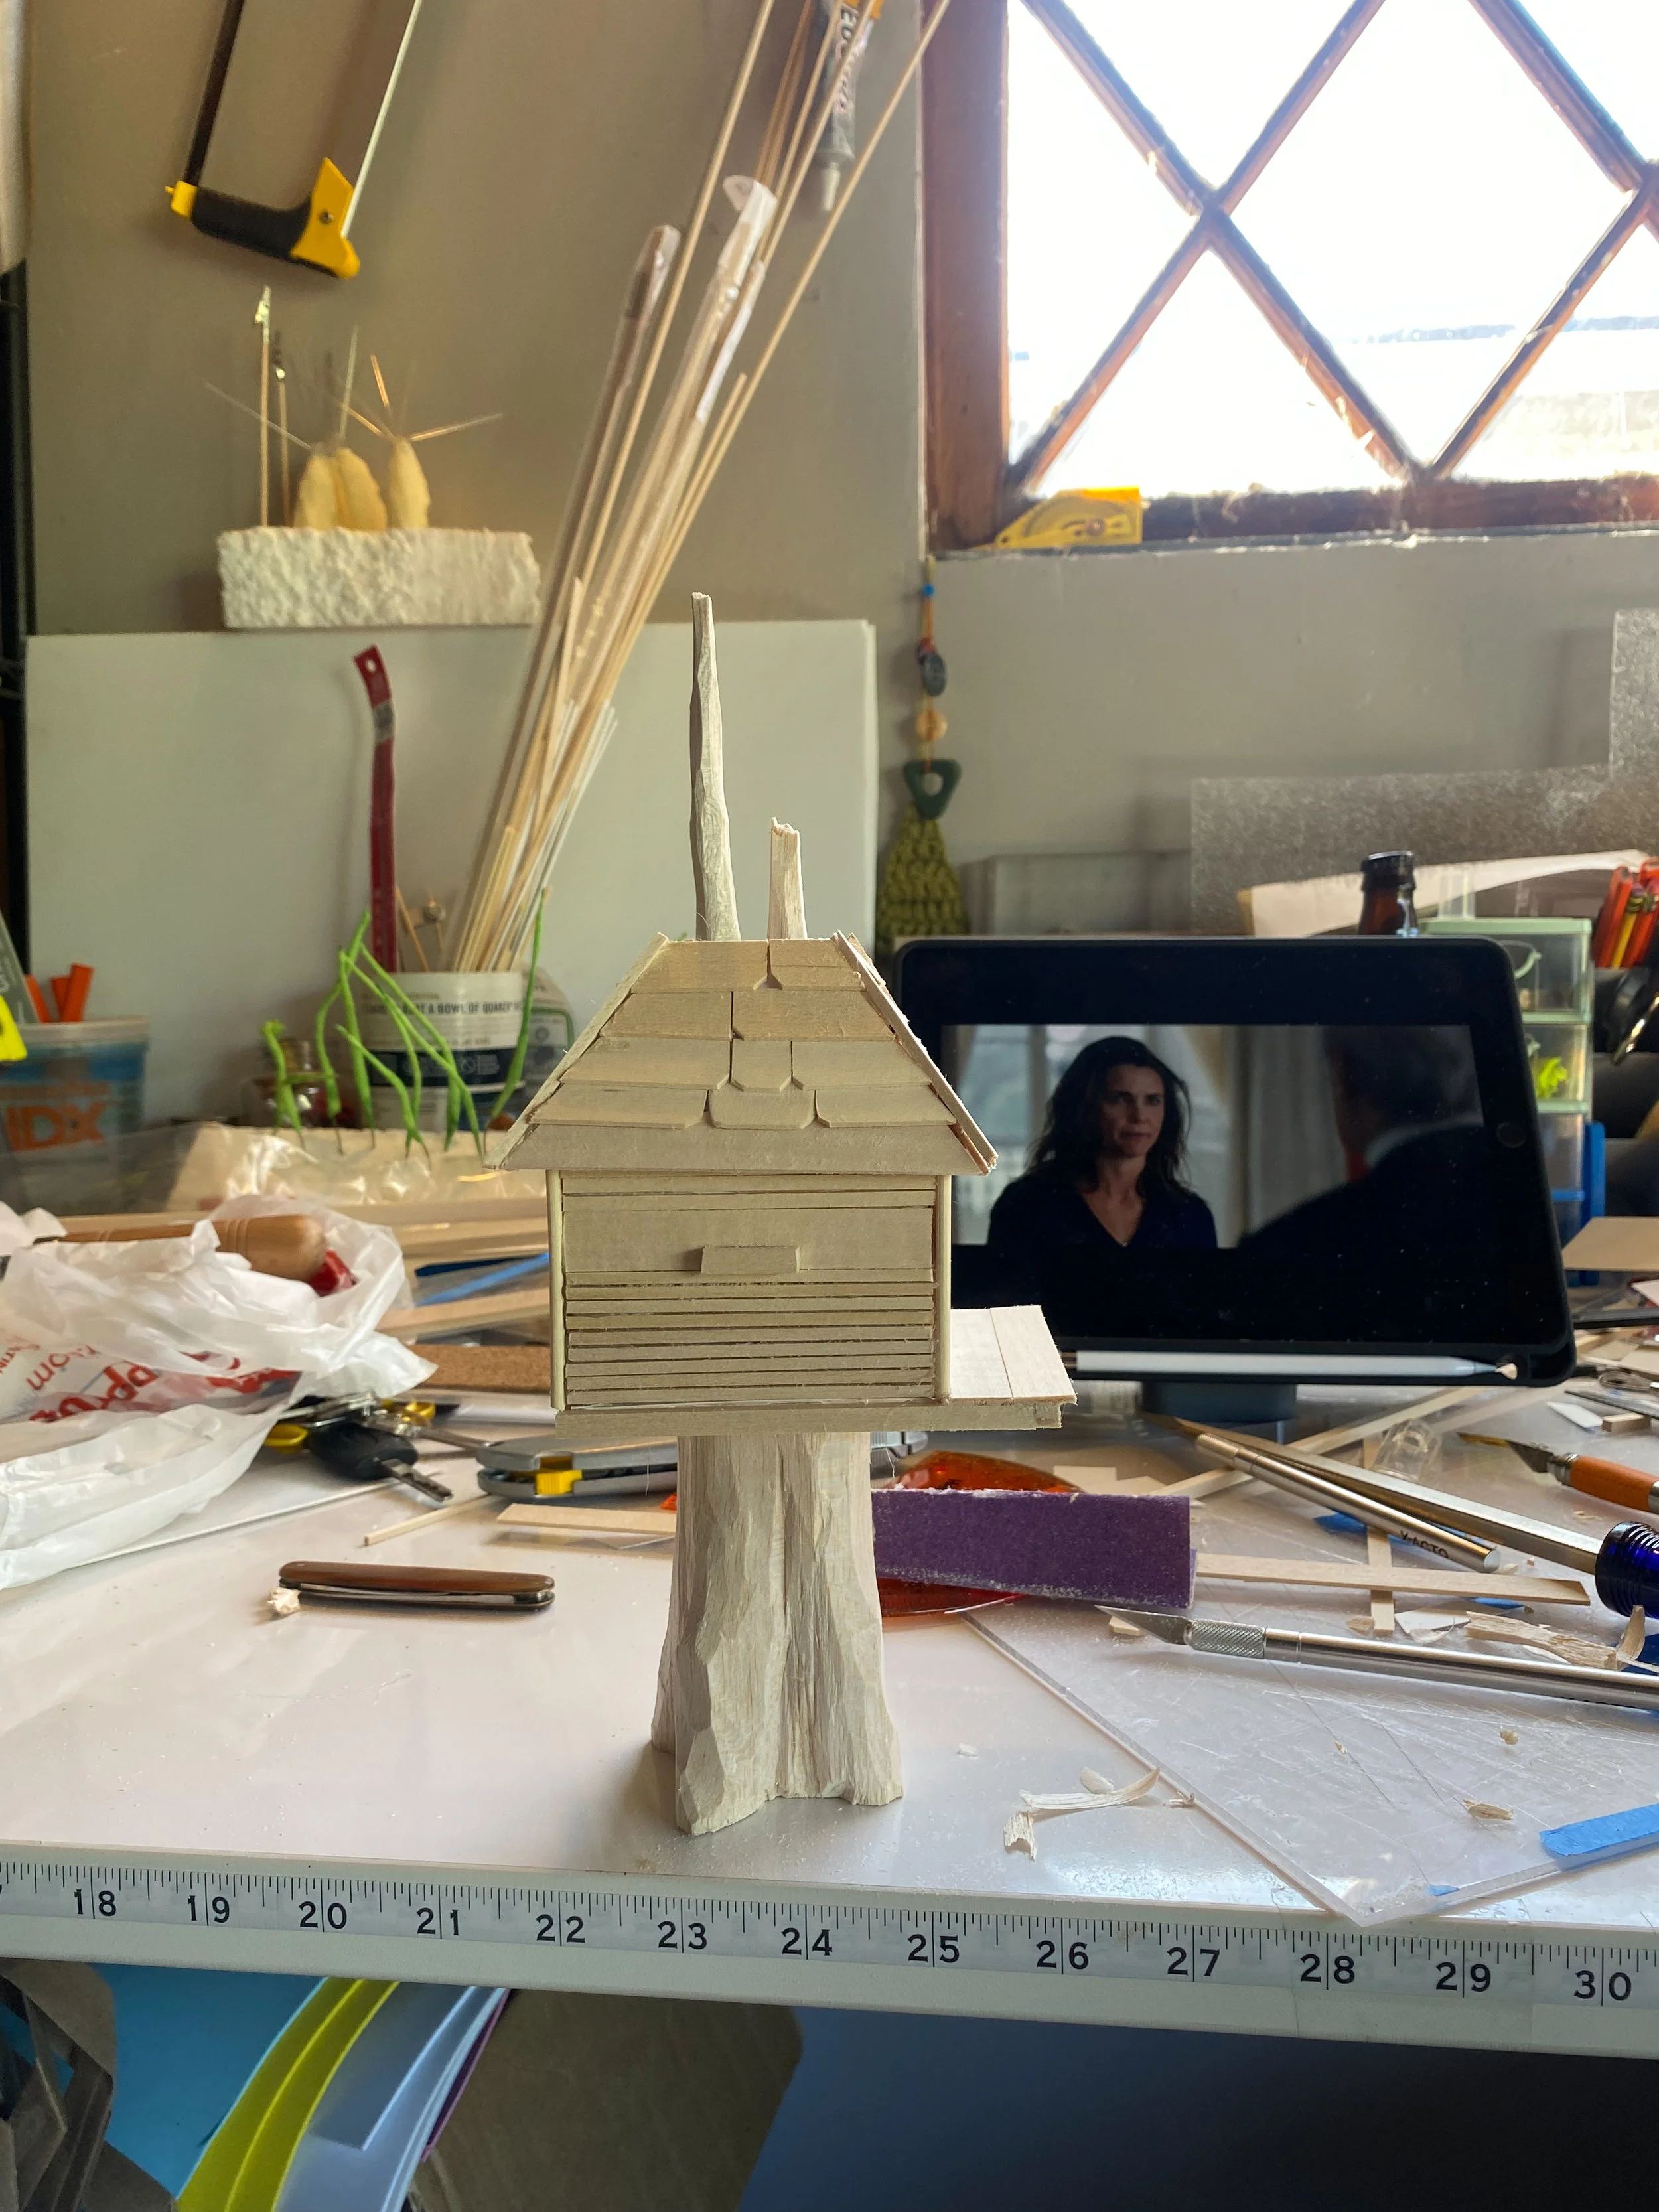
I went with a light weight cardboard called chipboard (think cereal box) for my walls. It’s easy to cut and when combined with a structured base creates a light but ridgid build. I cut my walls to 3” wide and 2” tall and then cut the panels for the roof to be 3” wide at the bottom, tapering to be 2 inches at the top and 1.5” tall. After all my walls were cut, I began to cut the decorative pieces for the outside walls (to the same dimensions as the wall panels), the shingles, and the interior structure for the corners and base for the tree house.

Step 5 - tape backs together
To aid with the building process I tape my walls together side by side. This makes gluing the walls together 1000% times easier. It allows them to bend at the seam so you can manipulate them to get the right angle.

Step 6 - add structural support
Now we take the interior structure pieces and glue them into the corners. To create the base we glue the pieces to each other with super glue.


Step 7 - Complete major sections (for example roof and base)
Now that you have your bases it is about adding the detail to the outside. For me this means the side boards and the shingles. Anytime I’m gluing something to cardboard I use hot glue because it is fast and typically has a better hold than superglue (super glue is really good for gluing the same material to itself).
Then I moved onto the little porch which included a railing. This was just a couple of pieces of wood that I cut and superglued together. Anytime you have to handle super small pieces it's good to use tweezers to help hold things in place until the glue dries.


Step 8 - Carve wood elements
I carved the tree trunk out of a chunk of balsa wood. You can get blocks in a variety of sizes at Hobby Lobby. I cut a section off and started whittling. I’ve found that it's best to go slow and constantly look at your carving from a variety of angles so that you can determine where you still need to carve chunks off.
For the branches that came out of the top I glued two triangle pieces of wood together with superglue. Then I carved them down. I miscalculated how tall they would need to be so I cut a small chunk of wood and glued it inside of the treehouse interior. Then I glued the branches to that. This gave me the height that I needed.

Step 9 - prep for paint
This means doing anything from sanding the wood to cleaning up excess hot glue bits. Depending on how careful you were during the build process will determine how much clean up you’ll need to do.
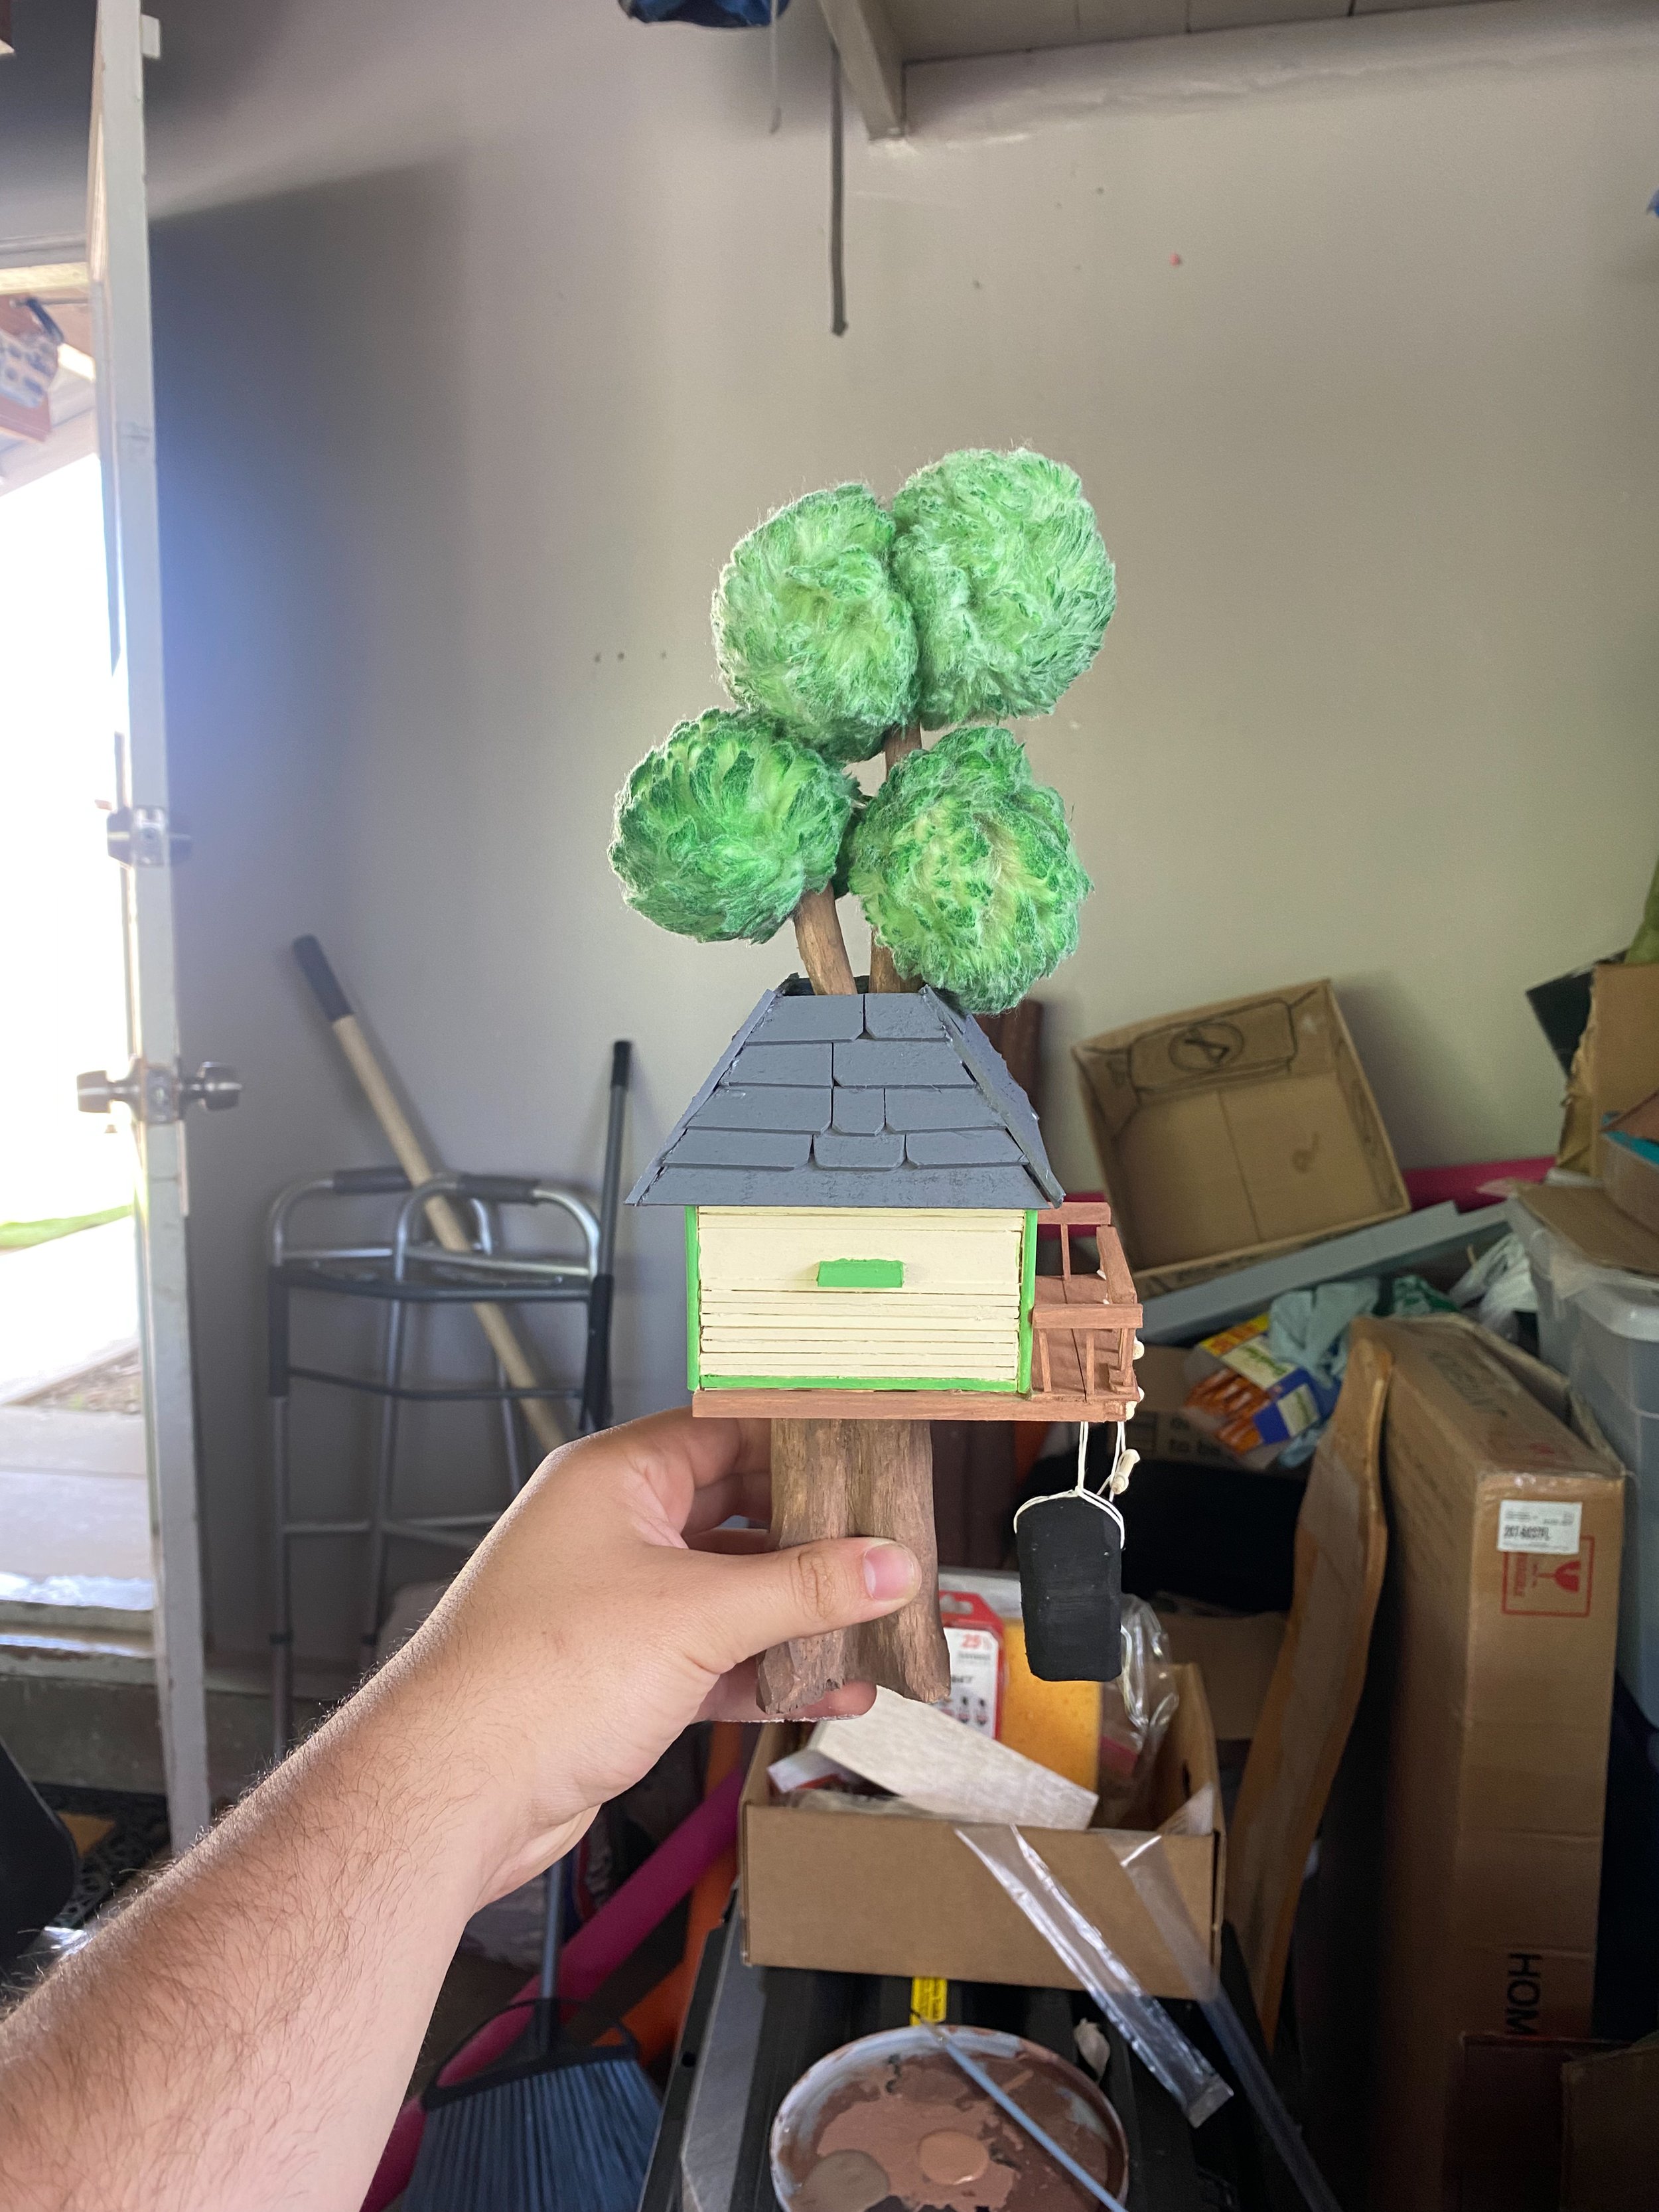
Step 10 - Paint
This is the step where the piece really comes to life and is honestly my favorite step! I applied my paint with normal paint brushes. I used the cheap craft paint that's $.63 a bottle from Hobby Lobby. I painted the walls and the porch with a brush and then spray painted the roof (simply because it was easier and I had gray primer).
I “painted” the white jumbo pom poms by mixing paint with water in a mason jar. I added the pom poms and then shook it and let them sit in the paint water for about an hour. Took them out and squeezed most of the water out and set them out to dry. To speed up the drying process the next day I took them and placed them into a cardboard box and used a hair dryer to blow hot air into the box from the top.


step 11 - final details
Final details for this build included a tire swing ( Even though I couldn’t see it behind the fence I thought it would add to the build.) and the rope ladder.
The rope ladder was made with small sections cut from a bamboo skewer and then I super glued the rope (waxed sting) to it.
For the tire swing I cut a smaller section from the chunk of balsa wood, cut the corners down with the saw, drilled a hole in the middle and then whittled the details out.
I glued them both to the tree house after I painted the tire swing to the underside of the build with super glue.
Then I added the painted pom poms to the top branches with hot glue, and boom DONE!
Step 12 - done!
Additional resources
Here are some additional resources to help you as you create small worlds.
Stop motion fabrication youtube playlist: https://www.youtube.com/playlist?list=PLbo-n7JG7rXiQkobIvY7RPeCuCveVBr-o
Woodworking youtube playlist: https://youtube.com/playlist?list=PLbo-n7JG7rXgQU6_IbwcMzhvwANxuxyBW
Best video on how to film and composite miniatures: https://www.youtube.com/watch?v=XJUHbdE0Dmg
Best miniature fabrication youtube channel. Full tutorials with blue prints and loads of other resources! https://www.youtube.com/@BentleyHouseMinis
List to common materials https://www.bentleyhouseminis.com/affiliate-links
In depth video on glue types! https://www.youtube.com/watch?v=h2yd1FF4ATw
What’s in my miniature travel kit video: https://www.youtube.com/watch?v=sJDrGeV0tVg
What I would do differently
The main issue I ran into was getting paint in places I didn’t want it. A simple way to avoid this would have been to just paint things before I glued them. This wouldn’t necessarily save time, but it would prevent some headaches. If you think ahead and plan your piece out in detail you can do this. I was kinda flying by the seat of my pants so I had to figure some things out as I went.
The second thing would have to be using better paint brushes. I only had larger brushes which contributed to the problem I listed above. If I had time I would have gone and bought some smaller brushes.
Used less hot glue. Some of the boards on the sides are over glued which means there is glue that pushes through the space between the boards, this isn’t noticeable until you are painting. I cleaned a lot of it up but it is still very noticeable .